
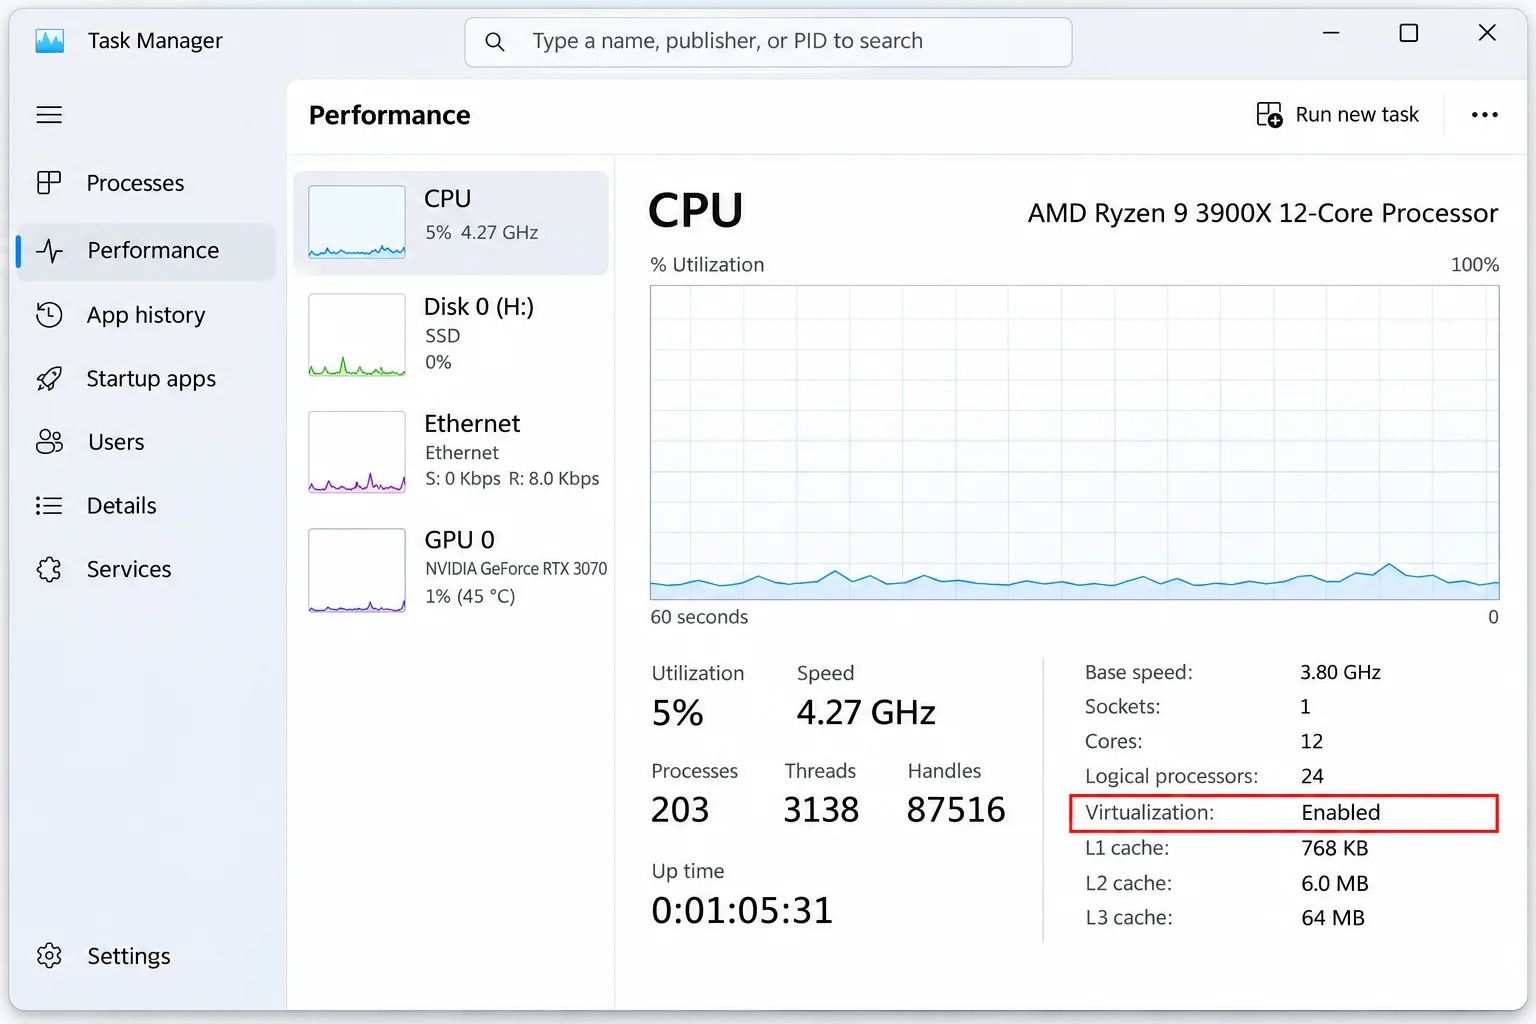
If your AMD PC runs tools like WSL 2, Hyper-V, VirtualBox, or Android and console emulators that report virtualization is not enabled, your system likely has AMD’s hardware virtualization turned off in the motherboard firmware. Checking your Task Manager performance graph may show Virtualization as Disabled. To resolve these errors, you must turn on SVM Mode in your BIOS, confirm the change in Windows, and activate any optional Windows features required by your specific applications.
Understanding AMD SVM Mode and Why You Need It
SVM Mode (Secure Virtual Machine) and AMD-V are two names for the exact same feature: AMD’s hardware-assisted virtualization. Intel’s equivalent technology is known as VT-x. Depending on your motherboard manufacturer and laptop model, your UEFI firmware might label the setting as AMD-V, AMD Virtualization, or Secure Virtual Machine instead of SVM Mode.
This setting lives directly in your PC’s UEFI firmware rather than inside Windows. When SVM is turned off, virtualization-dependent software may fail to start, throw configuration errors, or run with severely reduced performance. To use these capabilities, you need an AMD processor supporting SVM or AMD-V, Windows 11 (or Windows 10), and access to your UEFI firmware settings along with any necessary BIOS passwords.
Step-by-Step Guide: Enabling AMD SVM Mode in Windows 11
Enabling hardware virtualization requires checking your current status, navigating into your motherboard firmware, locating the SVM toggle, and saving your configuration properly.
Step 1: Check Current Virtualization Status
Before restarting your computer, verify whether virtualization is already active:
- Press Ctrl + Shift + Esc to open Task Manager.
- Click on the Performance tab and select CPU.
- Look for the Virtualization status displayed below the CPU graph.
If it says Enabled, your BIOS is already configured and you can skip straight to activating Windows features. If it says Disabled, proceed to the firmware settings.
Step 2: Enter Your BIOS/UEFI Firmware
You can enter UEFI firmware directly from Windows 11 without guessing boot keys:
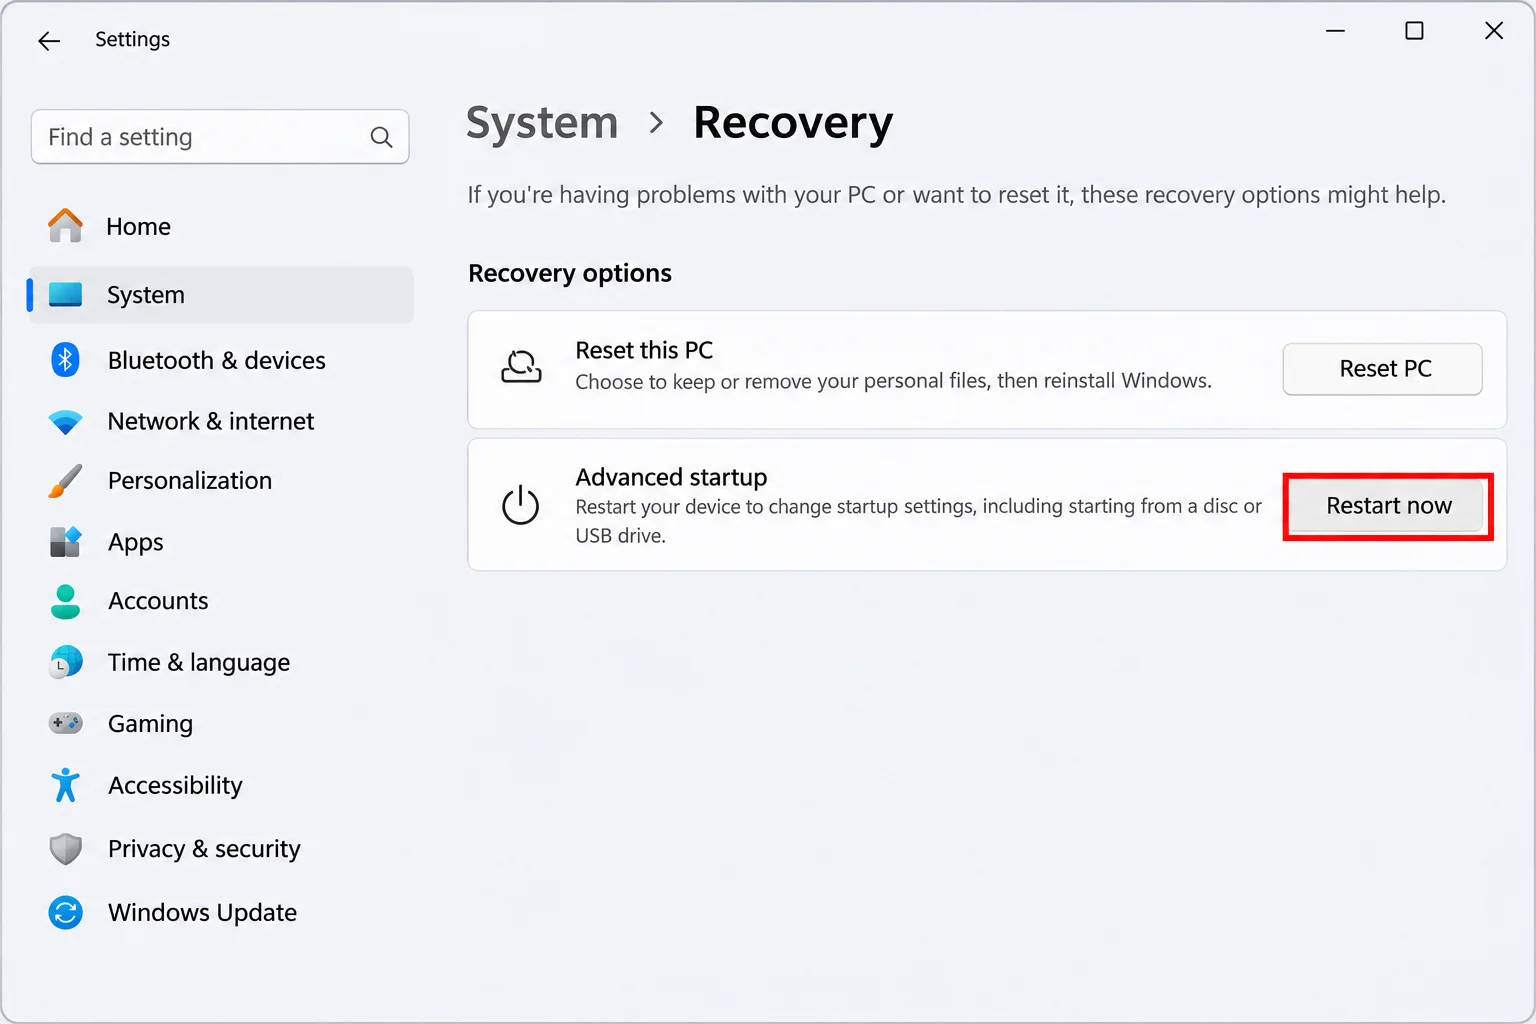
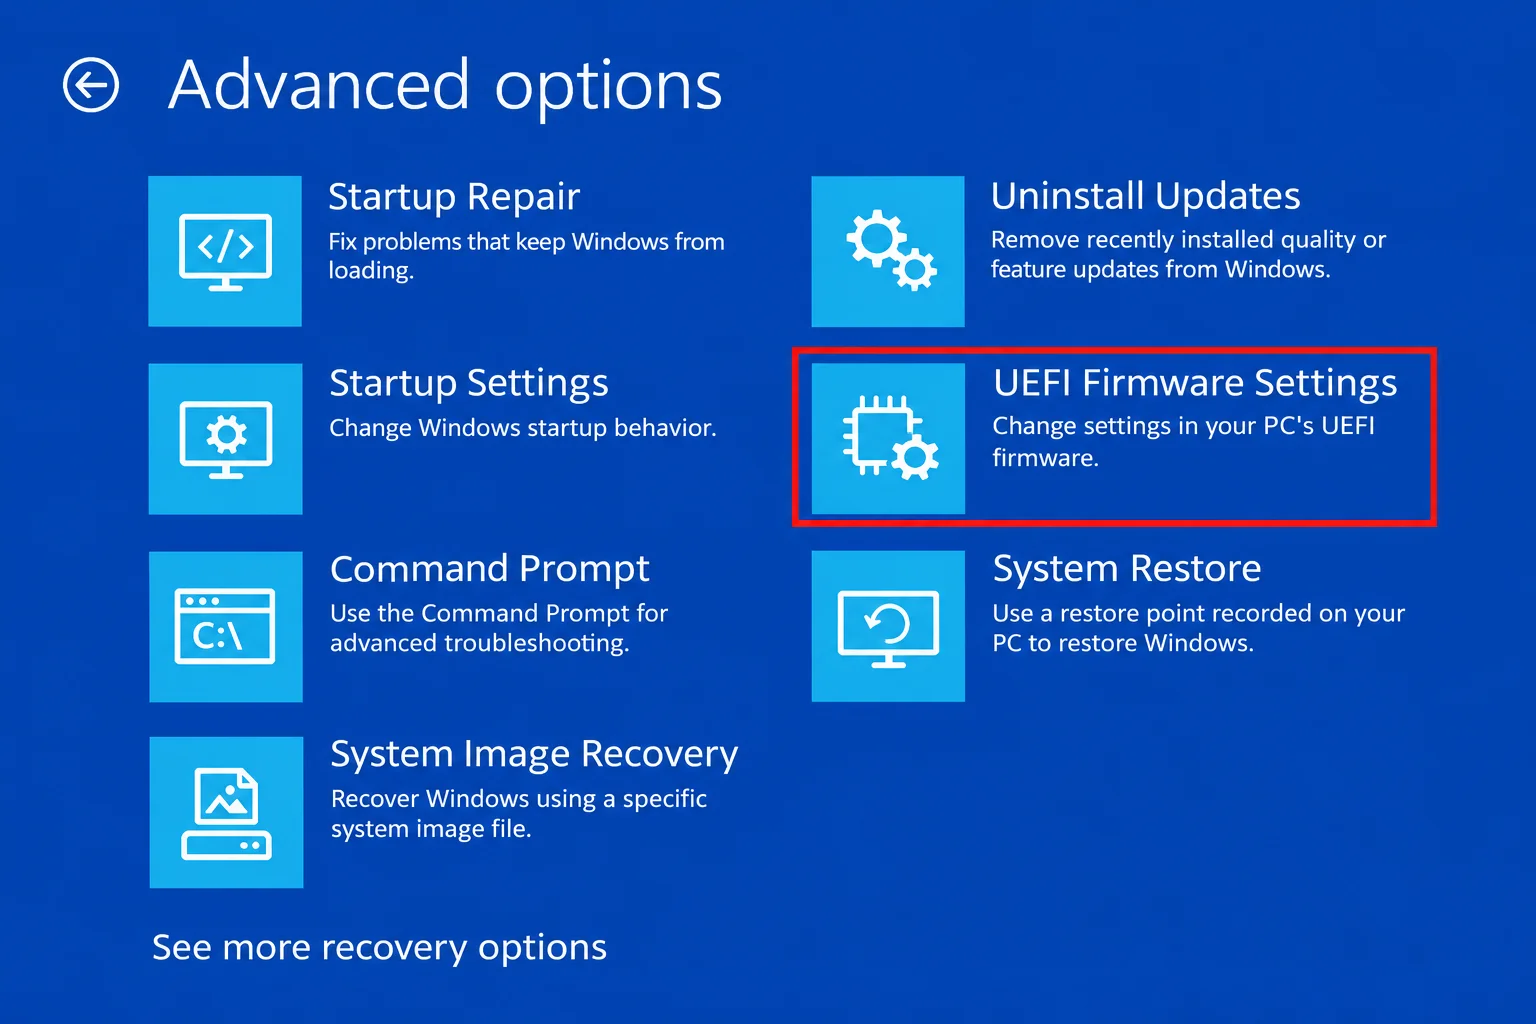
- Open Windows Settings, navigate to System > Recovery, and click Restart now next to Advanced startup. On the blue menu, choose Troubleshoot > Advanced options > UEFI Firmware Settings.
- Alternatively, open Windows Terminal as an administrator and run the command
shutdown /r /fw /t 0to reboot straight into firmware. - You can also restart your PC normally and repeatedly tap your manufacturer’s firmware key as soon as the screen lights up. This is commonly the Delete key on desktops and F2 or F10 on laptops.
Step 3: Switch to Advanced Mode
Some motherboard firmware opens to a simplified overview screen first. For instance, ASUS motherboards often open in EZ Mode. Press F7 to switch to Advanced Mode. Other manufacturers may use different function keys or an on-screen button to access advanced settings.
Step 4: Locate and Enable SVM Mode
Motherboard menu layouts vary by manufacturer. Common locations include:
- ASUS: Advanced Mode > Advanced tab > CPU Configuration or AMD Platform.
- Gigabyte / AORUS: Tweaker or Advanced Mode > CPU Settings.
- MSI: Settings > Advanced > Overclocking settings or CPU Features.
- ASRock: Advanced > CPU Configuration.
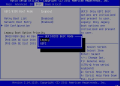
If your menus look different, look for SVM Mode, AMD-V, AMD Virtualization, or Secure Virtual Machine. Use your arrow keys or mouse to highlight the setting and change it to Enabled. Avoid modifying nearby IOMMU or overclocking options unless you specifically need them.
Step 5: Save Changes and Reboot
Press F10 to save your changes and exit the BIOS, confirming with OK or Yes. Your PC will restart into Windows. Do not cut power during this reboot sequence.
Configuring Required Windows Features
Enabling SVM in your BIOS gives Windows access to hardware virtualization, but certain applications also require matching optional Windows features to function correctly. Turn on only the components your apps require:
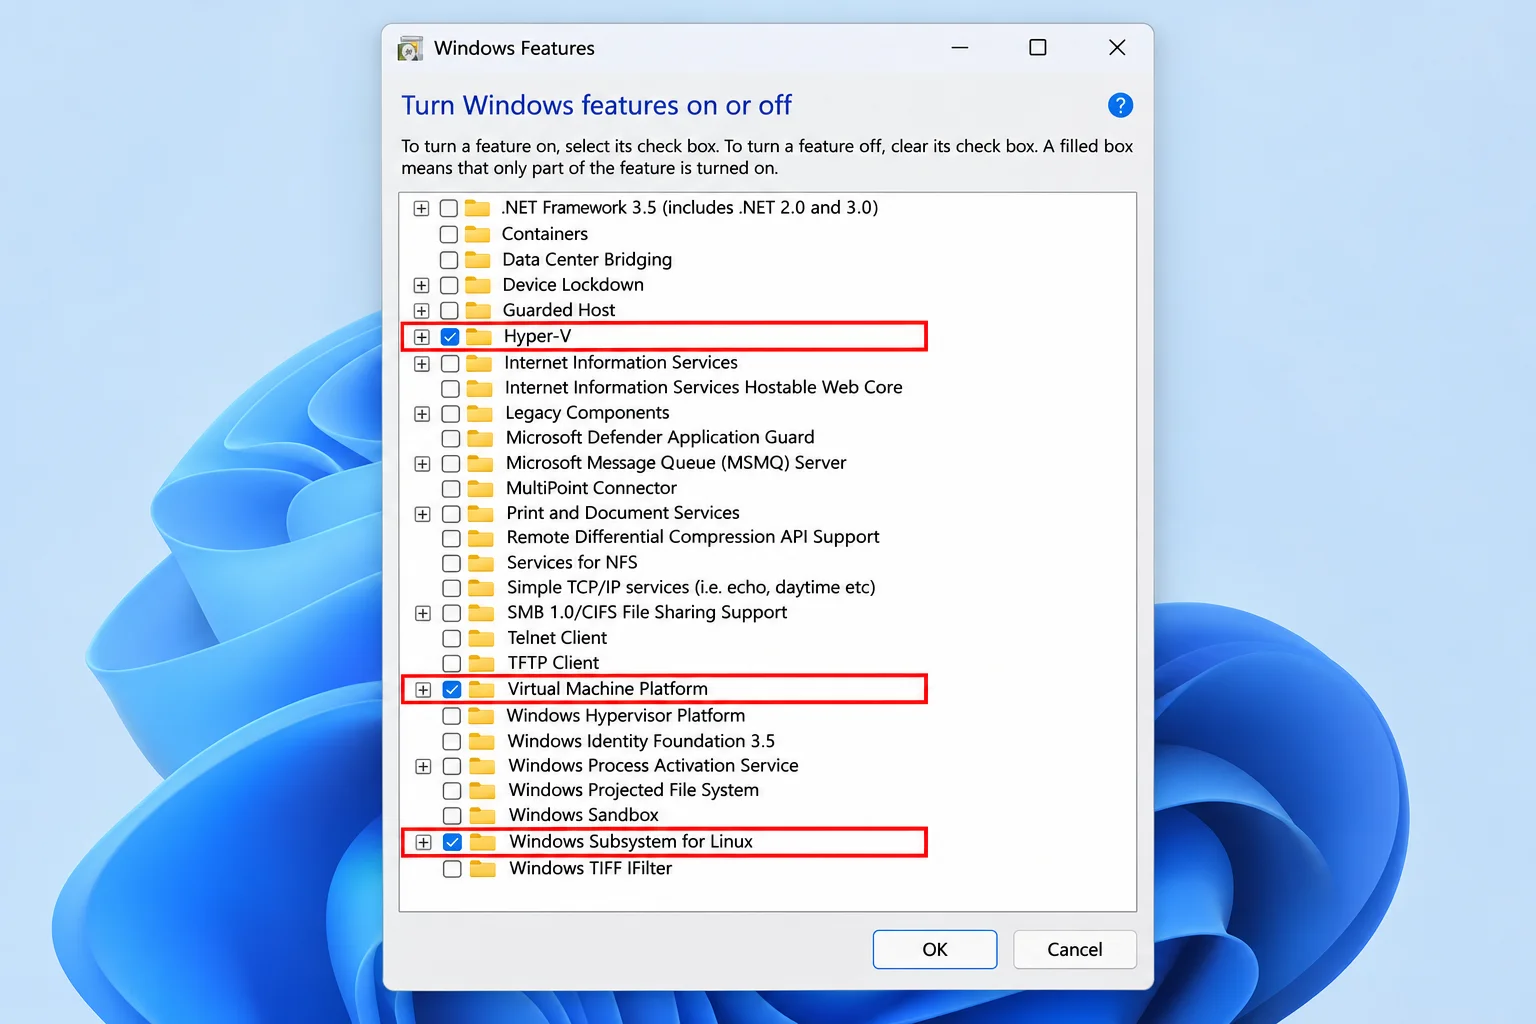
- Virtual Machine Platform: Required for WSL 2 and many modern emulators.
- Windows Subsystem for Linux: Required for running WSL.
- Hyper-V: Required for Hyper-V Manager (available on Pro, Enterprise, and Education editions).
- Windows Sandbox: Required for running the Sandbox environment.
- Windows Hypervisor Platform: Required if VirtualBox, VMware, or specific emulators request it.
To enable these, press the Windows key, type Turn Windows features on or off, check the boxes for the features you need, and click OK. Alternatively, you can run an elevated Terminal command to enable them and restart your system.
Note that turning on Hyper-V-based features can occasionally impact third-party hypervisors. Check your application documentation if you concurrently run software like VirtualBox or VMware.
Troubleshooting Common Virtualization Issues
If virtualization errors persist after making adjustments, check the following troubleshooting fixes:
- Perform a Full Restart: Firmware and feature changes only apply after a real reboot. Avoid using Sign out or Shut down if Fast Startup is enabled, as these can bypass a true hardware initialization.
- Check for Skipped Windows Features: If Task Manager shows virtualization is enabled but WSL 2 or Hyper-V still fail, verify that you enabled the required optional Windows features.
- Verify BIOS Save Settings: If Task Manager keeps showing Disabled after a reboot, you likely forgot to save your BIOS changes with F10. Weak CMOS batteries or firmware bugs can also reset settings.
- Run System Information Check: Open Command Prompt and type
systeminfo. Scroll down to the Hyper-V Requirements section to see if any lines report No. - Separate Windows 11 Install Errors: SVM Mode is distinct from Windows 11 installation requirements. If your PC fails to install Windows 11, turning on SVM will not help; you must enable TPM (fTPM) and Secure Boot instead.
- Address Nested Virtualization and Updates: If Windows runs inside another virtual machine, the host must pass virtualization through. If nested virtualization fails unexpectedly, installing the latest Windows updates may act as a helpful workaround.